Difference between revisions of "Stevens station"
(→Layout) |
|||
| (17 intermediate revisions by 7 users not shown) | |||
| Line 3: | Line 3: | ||
|Code={{Code/S|DT10|DTL|rr=0|br=none}}{{Code/S|TE11|TEL|rl=0|bl=none}} | |Code={{Code/S|DT10|DTL|rr=0|br=none}}{{Code/S|TE11|TEL|rl=0|bl=none}} | ||
|Name=Stevens<br>史蒂芬<br>ஸ்டீவன்ஸ் | |Name=Stevens<br>史蒂芬<br>ஸ்டீவன்ஸ் | ||
|Img=[[File:Stevens-DTL.png|centre|300px]] | |Img=[[File:Stevens-DTL.png|centre|300px]][[File:Stevens-TEL.png|centre|300px]] | ||
|Info= | |Info= | ||
{{Infoline|Address (DTL)|92 Stevens Road<br>Singapore 257877}} | {{Infoline|Address (DTL)|92 Stevens Road<br>Singapore 257877}} | ||
| Line 28: | Line 28: | ||
==Artworks== | ==Artworks== | ||
*[[File:DT10-PIN 23040.png|300px]]<br>{{DTL}}: ''PIN – 23040'' by Om Mee Ai<br>As a nod to the nature and history in the Stevens and Bukit Timah area surrounding the station, this work highlights manually stamped patterns of the foliage, seeds and fruits of nutmeg and rubber trees. These crops occupied the area back in the 19th century.<ref>[//www.lta.gov.sg/content/ltagov/en/getting_around/public_transport/a_better_public_transport_experience/art_in_transit.html "Art in Transit"]. Land Transport Authority.</ref> | *[[File:DT10-PIN 23040.png|300px]]<br>{{DTL}}: ''PIN – 23040'' by Om Mee Ai<br>As a nod to the nature and history in the Stevens and Bukit Timah area surrounding the station, this work highlights manually stamped patterns of the foliage, seeds and fruits of nutmeg and rubber trees. These crops occupied the area back in the 19th century.<ref name='AiT'>[//www.lta.gov.sg/content/ltagov/en/getting_around/public_transport/a_better_public_transport_experience/art_in_transit.html "Art in Transit"]. Land Transport Authority.</ref> | ||
*[[File:TE11-A Syllabus For Stevens.jpeg|300px]]<br>{{TEL}}: ''A Syllabus For Stevens'' by Shubigi Rao<br>Alongside students from neighbouring Raffles Girls’ School, in 2015 Rao generated a book list of whimsical, funny, and wishful subjects for ‘A Syllabus for Stevens’. Mimicking long library-like shelves of books, the work appears to be solid ‘book spines’ with engraved titles that allude to unheard-of branches of knowledge. The book spines are overlaid with limestone chalk, such that the materials (chalk on slate) is another pun about education.<ref name='AiT'/> | |||
==Layout== | ==Layout== | ||
| Line 40: | Line 42: | ||
|Singapore Chinese Girls School | |Singapore Chinese Girls School | ||
|- | |- | ||
!rowspan=2|B1 | !width=25 rowspan=2|B1 | ||
|width=125|TEL Concourse | |||
|Faregates, Ticketing Machines, Passenger Service Centre | |||
|- | |||
|Underpass|| | |Underpass|| | ||
|- | |- | ||
| | !width=25 rowspan=5|B2 | ||
|width=125|DTL Concourse | |||
|Faregates, Ticketing Machines, Passenger Service Centre | |||
|- | |- | ||
|Underpass|| | |Underpass|| | ||
|- | |- | ||
|Transfer | |Transfer Link | ||
| | |between {{DTL}} Platform B and {{TEL}} Platforms | ||
|- | |- | ||
|colspan=2 class="platform bottom"|Platform B | |colspan=2 class="platform bottom"|Platform B | ||
| Line 58: | Line 62: | ||
{| class="mw-collapsible mw-collapsed" style="width:100%;" | {| class="mw-collapsible mw-collapsed" style="width:100%;" | ||
!{{Layout/Platform|B|DTL}} | !{{Layout/Platform|B|DTL}} | ||
|style='padding-right:.5em;'|{{Layout/Arrow|DTL| | |style='padding-right:.5em;'|{{Layout/Arrow|DTL|180}} {{Layout/Station|DT35}} | ||
|style='padding-left:.5em;border-left:1px solid;width:200px'|'''Service Map''' | |style='padding-left:.5em;border-left:1px solid;width:200px'|'''Service Map''' | ||
|- | |- | ||
|colspan=3| | |colspan=3| | ||
<div style='overflow-x:scroll;white-space:nowrap;max-width:75vw;'> | <div style='overflow-x:scroll;white-space:nowrap;max-width:75vw;'> | ||
{{Layout/Map| | {{Layout/Map|DT35|c=DTL}} {{Layout/Map|DT34|c=DTL}} {{Layout/Map|DT33|c=DTL}} {{Layout/Map|DT32|c=DTL}} {{Layout/Map|DT31|c=DTL}} {{Layout/Map|DT30|c=DTL}} {{Layout/Map|DT29|c=DTL}} {{Layout/Map|DT28|c=DTL}} {{Layout/Map|DT27|c=DTL}} {{Layout/Map|DT26|c=DTL}} {{Layout/Map|DT25|c=DTL}} {{Layout/Map|DT24|c=DTL}} {{Layout/Map|DT23|c=DTL}} {{Layout/Map|DT22|c=DTL}} {{Layout/Map|DT21|c=DTL}} {{Layout/Map|DT20|c=DTL}} {{Layout/Map|DT19|c=DTL}} {{Layout/Map|DT18|c=DTL}} {{Layout/Map|DT17|c=DTL}} {{Layout/Map|DT16|c=DTL}} {{Layout/Map|DT15|c=DTL}} {{Layout/Map|DT14|c=DTL}} {{Layout/Map|DT13|c=DTL}} {{Layout/Map|DT12|c=DTL}} {{Layout/Map|DT11|c=DTL}} {{Layout/Map|DT10|#000|#fff|c=DTL|r=}} | ||
</div> | </div> | ||
|} | |} | ||
|- | |- | ||
!rowspan= | !rowspan=5|B3 | ||
|Transfer | |Transfer Link | ||
|between {{DTL}} Platforms | |between {{DTL}} Platforms | ||
|- | |- | ||
| Line 74: | Line 78: | ||
|between {{DTL}} Concourse | |between {{DTL}} Concourse | ||
|- | |- | ||
|TEL Platform | |colspan=2| | ||
{| class="mw-collapsible mw-collapsed" style="width:100%;" | |||
!{{Layout/Platform|C|TEL}} | |||
|style='padding-right:.5em;'|{{Layout/Arrow|TEL|0}} {{Layout/Station|TE29}} | |||
|style='padding-left:.5em;border-left:1px solid;width:200px'|'''Service Map''' | |||
|- | |||
|colspan=3| | |||
<div style='overflow-x:scroll;white-space:nowrap;max-width:75vw;'> | |||
{{Layout/Map|TE11|#000|#fff|c=TEL|l=}} {{Layout/Map|TE12|c=TEL|l=}} {{Layout/Map|TE13|c=TEL|l=}} {{Layout/Map|TE14|c=TEL|l=}} {{Layout/Map|TE15|c=TEL|l=}} {{Layout/Map|TE16|c=TEL|l=}} {{Layout/Map|TE17|c=TEL|l=}} {{Layout/Map|TE18|c=TEL|l=}} {{Layout/Map|TE19|c=TEL|l=}} {{Layout/Map|TE20|c=TEL|l=}} {{Layout/Map|TE22|c=TEL}} {{Layout/Map|TE23|c=TEL}} {{Layout/Map|TE24|c=TEL}} {{Layout/Map|TE25|c=TEL}} {{Layout/Map|TE26|c=TEL}} {{Layout/Map|TE27|c=TEL}} {{Layout/Map|TE28|c=TEL}} {{Layout/Map|TE29|c=TEL|r=}} | |||
</div> | |||
|} | |||
|- | |||
|colspan=2 class="platform"|Platform C/D | |||
|- | |||
|colspan=2| | |||
{| class="mw-collapsible mw-collapsed" style="width:100%;" | |||
!{{Layout/Platform|D|TEL}} | |||
|style='padding-right:.5em;'|{{Layout/Arrow|TEL|180}} {{Layout/Station|TE1}} | |||
|style='padding-left:.5em;border-left:1px solid;width:200px'|'''Service Map''' | |||
|- | |||
|colspan=3| | |||
<div style='overflow-x:scroll;white-space:nowrap;max-width:75vw;'> | |||
{{Layout/Map|TE1|c=TEL}} {{Layout/Map|TE2|c=TEL}} {{Layout/Map|TE3|c=TEL}} {{Layout/Map|TE4|c=TEL}} {{Layout/Map|TE5|c=TEL}} {{Layout/Map|TE6|c=TEL}} {{Layout/Map|TE7|c=TEL}} {{Layout/Map|TE8|c=TEL}} {{Layout/Map|TE9|c=TEL}} {{Layout/Map|TE11|#000|#fff|c=TEL|r=}} | |||
</div> | |||
|} | |||
|- | |- | ||
!width=25 rowspan=4|B4 | !width=25 rowspan=4|B4 | ||
| Line 80: | Line 108: | ||
|Faregates, Ticketing Machines | |Faregates, Ticketing Machines | ||
|- | |- | ||
|Transfer | |Transfer Link | ||
|between {{DTL}} Platform A and {{TEL}} Platforms | |||
|- | |- | ||
|colspan=2 class="platform bottom"|Platform A | |colspan=2 class="platform bottom"|Platform A | ||
| Line 87: | Line 116: | ||
{| class="mw-collapsible mw-collapsed" style="width:100%;" | {| class="mw-collapsible mw-collapsed" style="width:100%;" | ||
!{{Layout/Platform|A|DTL}} | !{{Layout/Platform|A|DTL}} | ||
|style='padding-right:.5em;'|{{Layout/Arrow|DTL| | |style='padding-right:.5em;'|{{Layout/Arrow|DTL|0}} {{Layout/Station|DT1}} | ||
|style='padding-left:.5em;border-left:1px solid;width:200px'|'''Service Map''' | |style='padding-left:.5em;border-left:1px solid;width:200px'|'''Service Map''' | ||
|- | |- | ||
|colspan=3| | |colspan=3| | ||
<div style='overflow-x:scroll;white-space:nowrap;max-width:75vw;'> | <div style='overflow-x:scroll;white-space:nowrap;max-width:75vw;'> | ||
{{Layout/Map| | {{Layout/Map|DT10|#000|#fff|c=DTL}} {{Layout/Map|DT9|c=DTL}} {{Layout/Map|DT8|c=DTL}} {{Layout/Map|DT7|c=DTL}} {{Layout/Map|DT6|c=DTL}} {{Layout/Map|DT5|c=DTL}} {{Layout/Map|DT4|c=DTL}} {{Layout/Map|DT3|c=DTL}} {{Layout/Map|DT2|c=DTL}} {{Layout/Map|DT1|c=DTL|r=}} | ||
</div> | </div> | ||
|} | |} | ||
| Line 119: | Line 148: | ||
!width=70|Mon − Fri!!width=70|Sat!!width=70|Sun & P.H.!!width=70|Daily | !width=70|Mon − Fri!!width=70|Sat!!width=70|Sun & P.H.!!width=70|Daily | ||
|- | |- | ||
!colspan=5 style="{{CSS/DTL| | !colspan=5 style="{{CSS/DTL|xfc=|xbc=}}text-align:center;"|{{Icon|MRT|W|20px|d=inline}} {{DTL|style={{CSS/DTL|bg=none|xfc=|xbc=}}}} | ||
{{Timing|DT1||05:58|05:58|06:18|00:30|nv=}} | {{Timing|DT1||05:58|05:58|06:18|00:30|nv=}} | ||
{{Timing|DT35||05:48|05:48|06:08|23:52|nv=}} | {{Timing|DT35||05:48|05:48|06:08|23:52|nv=}} | ||
|- | |- | ||
!colspan=5 style="{{CSS/TEL| | !colspan=5 style="{{CSS/TEL|xfc=|xbc=}}text-align:center;"|{{Icon|MRT|W|20px|d=inline}} {{TEL|style={{CSS/TEL|bg=none|xfc=|xbc=}}}} | ||
{{Timing|TE1||05: | {{Timing|TE1||05:59|05:59|06:19|00:19|nv=}} | ||
{{Timing|TE9||L=00: | {{Timing|TE9||L=00:31|nv=}} | ||
{{Timing| | {{Timing|TE29||05:51|05:51|06:11|23:56|nv=}} | ||
{{Timing|TE14||L=00: | {{Timing|TE27||L=00:02|nv=}} | ||
{{Timing|TE22||L=00:08|nv=}} | |||
{{Timing|TE17||L=00:14|nv=}} | |||
{{Timing|TE14||L=00:26|nv=}} | |||
|} | |} | ||
| Line 134: | Line 166: | ||
{|class="wikitable" | {|class="wikitable" | ||
!width=240|Bus Stop!!width=30|Exit!!width=300|Bus Service | !width=240|Bus Stop!!width=30|Exit!!width=300|Bus Service | ||
{{BusGuide|{{BS40081}}|1}}{{Bus/48}} {{Bus/67}} {{Bus/170}} {{Bus/960}} {{Bus/960|a=e}} {{Bus/972|a=M}} | {{BusGuide|{{BS40081|landmark=}}| {{Exit/Cell|1}} }}{{Bus/48}} {{Bus/67}} {{Bus/170}} {{Bus/960}} {{Bus/960|a=e}} {{Bus/972|a=M}} | ||
{{BusGuide|{{BS40089}}|5}}{{Bus/48}} {{Bus/67}} {{Bus/170}} {{Bus/960}} {{Bus/960|a=e}} {{Bus/972|a=M}} | {{BusGuide|{{BS40229|landmark=}}| {{Exit/Cell|2}} }}{{Bus/105}} {{Bus/132}} {{Bus/190}} {{Bus/972}} | ||
{{BusGuide|{{BS40221|landmark=}}| {{Exit/Cell|3}} }}{{Bus/105}} {{Bus/132}} {{Bus/190}} {{Bus/972}} | |||
{{BusGuide|{{BS40231|landmark=}}| {{Exit/Cell|4}} }}{{Bus/105}} {{Bus/132}} {{Bus/151}} {{Bus/153}} {{Bus/154}} {{Bus/156}} {{Bus/186}} {{Bus/190}} {{Bus/960}} {{Bus/960|a=e}} {{Bus/972}} {{Bus/972|a=M}} | |||
{{BusGuide|{{BS40239|landmark=}}| {{Exit/Cell|4}} }}{{Bus/105}} {{Bus/132}} {{Bus/151}} {{Bus/153}} {{Bus/154}} {{Bus/156}} {{Bus/186}} {{Bus/190}} {{Bus/960}} {{Bus/960|a=e}} {{Bus/972}} {{Bus/972|a=M}} | |||
{{BusGuide|{{BS40089|landmark=}}| {{Exit/Cell|5}} }}{{Bus/48}} {{Bus/67}} {{Bus/170}} {{Bus/960}} {{Bus/960|a=e}} {{Bus/972|a=M}} | |||
|} | |} | ||
Latest revision as of 21:08, 21 April 2025
!
|
TRAVEL ADVISORY (22/4/2025) | !
| ||||
|---|---|---|---|---|---|---|
| ||||||
Stevens 史蒂芬 ஸ்டீவன்ஸ் DT10 TE11 | |
  | |
| Station Information | |
|---|---|
| Address (DTL) | 92 Stevens Road Singapore 257877 |
| Address (TEL) | 82 Stevens Road Singapore 257879 |
| Line(s) | Downtown Line Thomson–East Coast Line |
| Structure | Underground |
| Connections | |
| Abbreviation | STV |
Stevens (DT10/TE11) is a Mass Rapid Transit (MRT) station on the Downtown Line and the Thomson–East Coast Line.
History[edit]
| Date | CollapseEvent |
|---|---|
| 27 December 2015 | Station officially opened |
| 13 November 2022 | Station interchanged with Thomson–East Coast Line |
Unpaid Transfers[edit]
As the paid areas between Downtown Line platforms were initially not connected at this station, commuters would be charged if they tapped out of the station platform if they entered the wrong platform. Passengers would need to travel to either Botanic Gardens or Newton to change direction as the two platforms are connected within each other. After public concerns, the Land Transport Authority announced on 31 December 2015 that there would be a 10-minute grace period for commuters to tap out and tap in again and not be charged if they entered the wrong platform. With the opening of the new underpass on 23 November 2019, the paid areas of both platforms are finally connected and the grace period has been removed.[1]
Artworks[edit]
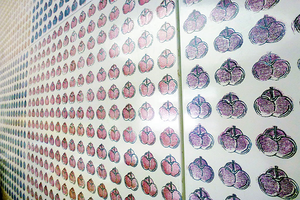
Downtown Line: PIN – 23040 by Om Mee Ai
As a nod to the nature and history in the Stevens and Bukit Timah area surrounding the station, this work highlights manually stamped patterns of the foliage, seeds and fruits of nutmeg and rubber trees. These crops occupied the area back in the 19th century.[2]

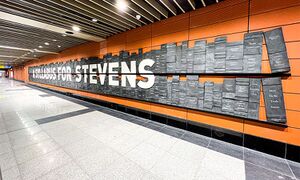
Thomson–East Coast Line: A Syllabus For Stevens by Shubigi Rao
Alongside students from neighbouring Raffles Girls’ School, in 2015 Rao generated a book list of whimsical, funny, and wishful subjects for ‘A Syllabus for Stevens’. Mimicking long library-like shelves of books, the work appears to be solid ‘book spines’ with engraved titles that allude to unheard-of branches of knowledge. The book spines are overlaid with limestone chalk, such that the materials (chalk on slate) is another pun about education.[2]

Layout[edit]
| L2 | Overhead Bridge | |||
|---|---|---|---|---|
| L1 | Street Level | Singapore Chinese Girls School | ||
| B1 | TEL Concourse | Faregates, Ticketing Machines, Passenger Service Centre | ||
| Underpass | ||||
| B2 | DTL Concourse | Faregates, Ticketing Machines, Passenger Service Centre | ||
| Underpass | ||||
| Transfer Link | between Downtown Line Platform B and Thomson–East Coast Line Platforms | |||
| Platform B | ||||
| ||||
| B3 | Transfer Link | between Downtown Line Platforms | ||
| Unpaid Link | between Downtown Line Concourse | |||
| ||||
| Platform C/D | ||||
| ||||
| B4 | DTL Concourse | Faregates, Ticketing Machines | ||
| Transfer Link | between Downtown Line Platform A and Thomson–East Coast Line Platforms | |||
| Platform A | ||||
| ||||
Exits[edit]
| Exit | Disabled-Access | Location/Nearby |
|---|---|---|
| 1 | Bukit Timah Road, Singapore Chinese Girls’ School | |
| 2 | Stevens Road | |
| 3 | Stevens Road | |
| 4 | Whitley Road, St. Joseph Institution | |
| 5 | Dunearn Road, Singapore Chinese Girls’ School |
Transport Services[edit]
First/Last Train Timing[edit]
| Destination | First Train | Last Train | ||
|---|---|---|---|---|
| Mon − Fri | Sat | Sun & P.H. | Daily | |
DT1 BP6 DT1 BP6 |
05:58 | 05:58 | 06:18 | 00:30 |
CG1 DT35 CG1 DT35 |
05:48 | 05:48 | 06:08 | 23:52 |
| 05:59 | 05:59 | 06:19 | 00:19 | |
CC17 TE9 CC17 TE9 |
– | – | – | 00:31 |
TE29 |
05:51 | 05:51 | 06:11 | 23:56 |
TE27 |
– | – | – | 00:02 |
| – | – | – | 00:08 | |
EW16 NE3 TE17 EW16 NE3 TE17 |
– | – | – | 00:14 |
NS22 TE14 NS22 TE14 |
– | – | – | 00:26 |
Bus[edit]
- More travel information: Alternative Travel Method
| Bus Stop | Exit | Bus Service |
|---|---|---|
40081 Stevens Stn Exit 1 Bt Timah Rd |
1 |
48 67 170 960 960e 972M |
40229 Bef Stevens Stn Exit 2 Stevens Rd |
2 |
105 132 190 972 |
40221 Stevens Stn Exit 3 Stevens Rd |
3 |
105 132 190 972 |
40231 Raffles Town Club Whitley Rd |
4 |
105 132 151 153 154 156 186 190 960 960e 972 972M |
40239 Bef Stevens Stn Exit 4 Whitley Rd |
4 |
105 132 151 153 154 156 186 190 960 960e 972 972M |
40089 Aft Stevens Stn Exit 5 Dunearn Rd |
5 |
48 67 170 960 960e 972M |
References[edit]
- ↑ "Air-conditioned underpass near 2 Bukit Timah schools opening at Stevens MRT station on Nov 23". Malavika Menon (Straits Times, 11 November 2019)
- ↑ Jump up to: 2.0 2.1 "Art in Transit". Land Transport Authority.
| [ V • T • E ] | ||
|---|---|---|
| Stations | Bukit Panjang • Cashew • Hillview • Hume • Beauty World • King Albert Park • Sixth Avenue • Tan Kah Kee • Botanic Gardens • Stevens • Newton • Little India • Rochor • Bugis • Promenade • Bayfront • Downtown • Telok Ayer • Chinatown • Fort Canning • Bencoolen • Jalan Besar • Bendemeer • Geylang Bahru • Mattar • MacPherson • Ubi • Kaki Bukit • Bedok North • Bedok Reservoir • Tampines West • Tampines • Tampines East • Upper Changi • Expo | |
| DTL3eXilin • Sungei Bedok | ||
| Rolling Stock | 951 | |
| Depots | Gali Batu • Kim Chuan • East Coast | |
| Others | Bridging Service | |
| [ V • T • E ] | ||
|---|---|---|
| Stations | Woodlands North • Woodlands • Woodlands South • Springleaf • Lentor • Mayflower • Bright Hill • Upper Thomson • Caldecott • Mount Pleasant • Stevens • Napier • Orchard Boulevard • Orchard • Great World • Havelock • Outram Park • Maxwell • Shenton Way • Marina Bay • Marina South • Gardens by the Bay • Founders' Memorial • Tanjong Rhu • Katong Park • Tanjong Katong • Marine Parade • Marine Terrace • Siglap • Bayshore • Bedok South • Sungei Bedok | |
| Rolling Stock | T251 | |
| Depots | Mandai • East Coast | |
| Others | Bridging Service | |