Difference between revisions of "Tai Seng station"
Jump to navigation
Jump to search
m (Removed protection from "Tai Seng station") |
m (→Bus) |
||
| (9 intermediate revisions by 2 users not shown) | |||
| Line 1: | Line 1: | ||
{{Infobox/Station | {{Infobox/Station | ||
|TA1=RCC | |TA1=RCC | ||
|Code={{Code/ | |Code={{Code/S|CC11|CCL}} | ||
|Name=Tai Seng<br>大成<br>தை செங் | |Name=Tai Seng<br>大成<br>தை செங் | ||
|Img=[[File:Tai Seng-CCL.png|centre|300px]] | |Img=[[File:Tai Seng-CCL.png|centre|300px]] | ||
| Line 8: | Line 8: | ||
{{Infoline|Line(s)|{{CCL}}}} | {{Infoline|Line(s)|{{CCL}}}} | ||
{{Infoline|Structure|Underground}} | {{Infoline|Structure|Underground}} | ||
{{Infoline|Connections| | {{Infoline|Connections|{{Icon|Bus|B|25px|o={{CSS/BUS|s=|f=}}|a=Bus|d=inline}} {{Icon|Taxi|W|25px|o={{CSS/LTA|s=|f=}}|a=Taxi|d=inline}}}} | ||
{{Infoline|Abbreviation|TSG}} | {{Infoline|Abbreviation|TSG}} | ||
}} | }} | ||
| Line 29: | Line 29: | ||
|Street Level | |Street Level | ||
| | | | ||
|- | |- | ||
!width=25|B1 | !width=25|B1 | ||
|width=125|Concourse | |width=125|Concourse | ||
| Line 35: | Line 35: | ||
|- | |- | ||
!rowspan=3|B2 | !rowspan=3|B2 | ||
|colspan=2|{{ | |colspan=2| | ||
{| class="mw-collapsible mw-collapsed" style="width:100%;" | |||
!{{Layout/Platform|A|CCL}} | |||
|style='padding-right:.5em;'|{{Layout/Arrow|CCL|0}} {{Layout/Station|CC29}} | |||
|style='padding-left:.5em;border-left:1px solid;width:200px'|'''Service Map''' | |||
|- | |||
|colspan=3| | |||
<div style='overflow-x:scroll;white-space:nowrap;max-width:75vw;'> | |||
{{Layout/Map|CC11|#000|#fff|c=CCL}} {{Layout/Map|CC12|c=CCL}} {{Layout/Map|CC13|c=CCL}} {{Layout/Map|CC14|c=CCL}} {{Layout/Map|CC15|c=CCL}} {{Layout/Map|CC16|c=CCL}} {{Layout/Map|CC17|c=CCL}} {{Layout/Map|CC19|c=CCL}} {{Layout/Map|CC20|c=CCL}} {{Layout/Map|CC21|c=CCL}} {{Layout/Map|CC22|c=CCL}} {{Layout/Map|CC23|c=CCL}} {{Layout/Map|CC24|c=CCL}} {{Layout/Map|CC25|c=CCL}} {{Layout/Map|CC26|c=CCL}} {{Layout/Map|CC27|c=CCL}} {{Layout/Map|CC28|c=CCL}} {{Layout/Map|CC29|c=CCL|r=}} | |||
</div> | |||
|} | |||
|- | |- | ||
|colspan=2 class="platform"|Platform A/B | |colspan=2 class="platform"|Platform A/B | ||
|- | |- | ||
|colspan=2|{{ | |colspan=2| | ||
{| class="mw-collapsible mw-collapsed" style="width:100%;" | |||
!{{Layout/Platform|B|CCL}} | |||
|style='padding-right:.5em;'|{{Layout/Arrow|CCL|180}} <span style="display:inline-block;vertical-align:middle;"><span style="display:block;text-align:left;>{{Layout/Station|CC1}}</span><span style="display:block;text-align:left;>{{Layout/Station|CE2}} <small> via {{Layout/Station|CC4}}</small></span></span> | |||
|style='padding-left:.5em;border-left:1px solid;width:200px'|'''Service Map''' | |||
|- | |||
|colspan=3| | |||
<div style='overflow-x:scroll;white-space:nowrap;max-width:75vw;'> | |||
<span style="display:inline-block;vertical-align:top;><span style="display:block;text-align:right;">{{Layout/Map|CC1|c=CCL}} {{Layout/Map|CC2|c=CCL}} {{Layout/Map|CC3|c=CCL}}</span><span style="display:block;text-align:right;">{{Layout/Map|CE2|c=CCL}} {{Layout/Map|CE1|c=CCL|r=}}</span></span> {{Layout/Map|CC4|c=CCL|l={{Layout/Map-BL|c=CCL}}}} {{Layout/Map|CC5|c=CCL}} {{Layout/Map|CC6|c=CCL}} {{Layout/Map|CC7|c=CCL}} {{Layout/Map|CC8|c=CCL}} {{Layout/Map|CC9|c=CCL}} {{Layout/Map|CC10|c=CCL}} {{Layout/Map|CC11|#000|#fff|c=CCL|r=}} | |||
</div> | |||
|} | |||
|} | |} | ||
| Line 48: | Line 68: | ||
|A||{{WAB}}||style="text-align:left;"|Upper Paya Lebar Road, Irving Road | |A||{{WAB}}||style="text-align:left;"|Upper Paya Lebar Road, Irving Road | ||
|- | |- | ||
|B|| ||style="text-align:left;"|Upper Paya Lebar Road, Macpherson Road | |B||{{NWAB}}||style="text-align:left;"|Upper Paya Lebar Road, Macpherson Road | ||
|- | |- | ||
|C||{{WAB}}||style="text-align:left;"|18 Tai Seng | |C||{{WAB}}||style="text-align:left;"|18 Tai Seng | ||
| Line 60: | Line 80: | ||
!width=70|Mon − Fri!!width=70|Sat!!width=70|Sun & P.H.!!width=70|Daily | !width=70|Mon − Fri!!width=70|Sat!!width=70|Sun & P.H.!!width=70|Daily | ||
|- | |- | ||
!colspan=5 style="{{CSS/CCL| | !colspan=5 style="{{CSS/CCL|s=|t=}}text-align:center;"|{{Icon|MRT|B|20px|d=inline}} {{CCL|style={{CSS/CCL|bg=none|s=|t=}}}} | ||
{{Timing|CC1||05:35|05:35|06:02|23:44|nv=}} | {{Timing|CC1||05:35|05:35|06:02|23:44|nv=}} | ||
{{Timing|CC7||L=00:21|nv=}} | {{Timing|CC7||L=00:21|nv=}} | ||
| Line 70: | Line 90: | ||
===Bus=== | ===Bus=== | ||
:''More travel information: [[Alternative Travel Method/Tai Seng|Alternative Travel Method]]'' | |||
{|class="wikitable" | {|class="wikitable" | ||
!width=240|Bus Stop!!width=30|Exit!!width=300|Bus Service | !width=240|Bus Stop!!width=30|Exit!!width=300|Bus Service | ||
{{BusGuide| | {{BusGuide|{{BS70281|landmark=}}| {{Exit/Cell|A}} }}{{Bus/22}} {{Bus/24}} {{Bus/28}} {{Bus/43}} {{Bus/58}} {{Bus/62}} {{Bus/70}} {{Bus/70|a=M}} {{Bus/76}} {{Bus/80}} {{Bus/93}} {{Bus/158}} | ||
{{BusGuide| | {{BusGuide|{{BS70289|landmark=}}| {{Exit/Cell|C}} }}{{Bus/22}} {{Bus/24}} {{Bus/28}} {{Bus/43}} {{Bus/58}} {{Bus/62}} {{Bus/70}} {{Bus/70|a=M}} {{Bus/76}} {{Bus/80}} {{Bus/93}} {{Bus/158}} | ||
|} | |} | ||
Latest revision as of 16:07, 13 March 2025
Tai Seng 大成 தை செங் CC11 | |
 | |
| Station Information | |
|---|---|
| Address | 33 Upper Paya Lebar Road Singapore 534803 |
| Line(s) | Circle Line |
| Structure | Underground |
| Connections | |
| Abbreviation | TSG |
Tai Seng (CC11) is a Mass Rapid Transit (MRT) station on the Circle Line.
History[edit]
| Date | CollapseEvent |
|---|---|
| 28 May 2009 | Station officially opened |
Artworks[edit]
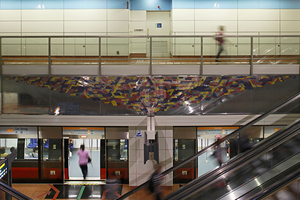
Circle Line: Equilibrium by Francis Ng
Two colourful displays of equilateral triangles reflect off one another to metaphorically explore the relationship between commuters in the hustle of modern life. This richly-hued expression of beautiful ordered chaos also represents the organic and dynamic movements of the business and industries in the area.[1]

Layout[edit]
| L1 | Street Level | ||||
|---|---|---|---|---|---|
| B1 | Concourse | Faregates, Ticketing Machines, Passenger Service Centre | |||
| B2 |
| ||||
| Platform A/B | |||||
| |||||
Exits[edit]
| Exit | Disabled-Access | Location/Nearby |
|---|---|---|
| A | Upper Paya Lebar Road, Irving Road | |
| B | Upper Paya Lebar Road, Macpherson Road | |
| C | 18 Tai Seng |
Transport Services[edit]
First/Last Train Timing[edit]
| Destination | First Train | Last Train | ||
|---|---|---|---|---|
| Mon − Fri | Sat | Sun & P.H. | Daily | |
| CC1Dhoby Ghaut | 05:35 | 05:35 | 06:02 | 23:44 |
| CC7Mountbatten | – | – | – | 00:21 |
| CC29HarbourFront | 05:44 | 05:44 | 06:11 | 23:08 |
| CC26Pasir Panjang | – | – | – | 23:38 |
| CC23one-north | – | – | – | 23:54 |
| CC17Caldecott | – | – | – | 00:22 |
Bus[edit]
- More travel information: Alternative Travel Method
| Bus Stop | Exit | Bus Service |
|---|---|---|
Aft Tai Seng Stn Upp Paya Lebar Rd |
A |
22 24 28 43 58 62 70 70M 76 80 93 158 |
Aft Tai Seng Stn Exit C Upp Paya Lebar Rd |
C |
22 24 28 43 58 62 70 70M 76 80 93 158 |
References[edit]
- ↑ "Art in Transit". Land Transport Authority.
| [ V • T • E ] | ||
|---|---|---|
| Stations | Dhoby Ghaut • Bras Basah • Esplanade • Promenade • Nicoll Highway • Stadium • Mountbatten • Dakota • Paya Lebar • MacPherson • Tai Seng • Bartley • Serangoon • Lorong Chuan • Bishan • Marymount • Caldecott • Bukit Brown • Botanic Gardens • Farrer Road • Holland Village • Buona Vista • one-north • Kent Ridge • Haw Par Villa • Pasir Panjang • Labrador Park • Telok Blangah • HarbourFront | |
| CCL6Keppel • Cantonment • Prince Edward Road | ||
| Circle Line ExtensionPromenade • Bayfront • Marina Bay | ||
| Rolling Stock | 830 • 830C • 851E | |
| Depots | Kim Chuan | |
| Others | Bridging Service | |