Difference between revisions of "Sengkang station"
Jump to navigation
Jump to search
Wekelwrady (talk | contribs) (→Layout: Implementing Geographical Layout as agreed upon) |
m |
||
| (9 intermediate revisions by 3 users not shown) | |||
| Line 37: | Line 37: | ||
|colspan=3| | |colspan=3| | ||
<div style='overflow-x:scroll;white-space:nowrap;max-width:75vw;'> | <div style='overflow-x:scroll;white-space:nowrap;max-width:75vw;'> | ||
<span style="display:inline-block;vertical-align:top;padding-left:1.5em;><span style="display:block;text-align:right;">{{Layout/Map|SW4|c=SKLRT|l={{Layout/Map-UL|c=SKLRT|height=10.1em}}}} {{Layout/Map|SW3|c=SKLRT}} {{Layout/Map|SW2|c=SKLRT}} {{Layout/Map|SW1|c=SKLRT|width=5.2em|r={{Layout/Map-R|c= | <span style="display:inline-block;vertical-align:top;padding-left:1.5em;><span style="display:block;text-align:right;">{{Layout/Map|SW4|c=SKLRT|l={{Layout/Map-UL|c=SKLRT|height=10.1em}}}} {{Layout/Map|SW3|c=SKLRT}} {{Layout/Map|SW2|c=SKLRT}} {{Layout/Map|SW1|c=SKLRT|width=5.2em|r={{Layout/Map-R|c=SKLRT|width=3em}}}}</span><span style="display:block;text-align:right;">{{Layout/Map|SW5|c=SKLRT}} {{Layout/Map|SW6|c=SKLRT}} {{Layout/Map|SW7|c=SKLRT}} {{Layout/Map|SW8|c=SKLRT|width=5.2em|r=}}</span></span> {{Layout/Map|STC|c=SKLRT|#000|#fff|width=5.2em|l={{Layout/Map-BL|c=SKLRT|right=6em}}|r={{Layout/Map-BR|c=SKLRT|left=4.5em|width=5.5em}}}} <span style="display:inline-block;vertical-align:top;padding-right:2em;><span style="display:block;text-align:left;"> {{Layout/Map|SE1|c=SKLRT|l={{Layout/Map-R|c=SKLRT|right=2em|width=5.2em}}}} {{Layout/Map|SE2|c=SKLRT}} {{Layout/Map|SE3|c=SKLRT|r={{Layout/Map-UR|c=SKLRT|right=-2em|height=10.1em|width=2em}}}}</span><span style="display:block;text-align:right;">{{Layout/Map|SE5|c=SKLRT}} {{Layout/Map|SE4|c=SKLRT|r=}}</span></span> | ||
</div> | </div> | ||
|} | |} | ||
| Line 45: | Line 45: | ||
|colspan=2| | |colspan=2| | ||
{| class="mw-collapsible mw-collapsed" style="width:100%;" | {| class="mw-collapsible mw-collapsed" style="width:100%;" | ||
!{{Layout/Platform|2| | !{{Layout/Platform|2|SKLRT}} | ||
|style='padding-right:.5em;'|{{Layout/Arrow|SKLRT|180}} <span style="display:inline-block;vertical-align:middle;"><span style="display:block;text-align:left;>'''Service B:''' via {{Layout/Station|SW1}}</span><span style="display:block;text-align:left;>'''Service C:''' | |style='padding-right:.5em;'|{{Layout/Arrow|SKLRT|180}} <span style="display:inline-block;vertical-align:middle;"><span style="display:block;text-align:left;>'''Service B:''' via {{Layout/Station|SW1}}</span><span style="display:block;text-align:left;>'''Service C:''' via {{Layout/Station|SE1}}</span></span> | ||
|style='padding-left:.5em;border-left:1px solid;width:200px'|'''Service Map''' | |style='padding-left:.5em;border-left:1px solid;width:200px'|'''Service Map''' | ||
|- | |- | ||
|colspan=3| | |colspan=3| | ||
<div style='overflow-x:scroll;white-space:nowrap;max-width:75vw;'> | <div style='overflow-x:scroll;white-space:nowrap;max-width:75vw;'> | ||
<span style="display:inline-block;vertical-align:top;padding-left:1.5em;><span style="display:block;text-align:right;">{{Layout/Map|SW4|c=SKLRT|l={{Layout/Map-UL|c=SKLRT|height=10.1em}}}} {{Layout/Map|SW3|c=SKLRT}} {{Layout/Map|SW2|c=SKLRT}} {{Layout/Map|SW1|c=SKLRT|width=5.2em|r={{Layout/Map-R|c= | <span style="display:inline-block;vertical-align:top;padding-left:1.5em;><span style="display:block;text-align:right;">{{Layout/Map|SW4|c=SKLRT|l={{Layout/Map-UL|c=SKLRT|height=10.1em}}}} {{Layout/Map|SW3|c=SKLRT}} {{Layout/Map|SW2|c=SKLRT}} {{Layout/Map|SW1|c=SKLRT|width=5.2em|r={{Layout/Map-R|c=SKLRT|width=3em}}}}</span><span style="display:block;text-align:right;">{{Layout/Map|SW5|c=SKLRT}} {{Layout/Map|SW6|c=SKLRT}} {{Layout/Map|SW7|c=SKLRT}} {{Layout/Map|SW8|c=SKLRT|width=5.2em|r=}}</span></span> {{Layout/Map|STC|c=SKLRT|#000|#fff|width=5.2em|l={{Layout/Map-BL|c=SKLRT|right=6em}}|r={{Layout/Map-BR|c=SKLRT|left=4.5em|width=5.5em}}}} <span style="display:inline-block;vertical-align:top;padding-right:2em;><span style="display:block;text-align:left;"> {{Layout/Map|SE1|c=SKLRT|l={{Layout/Map-R|c=SKLRT|right=2em|width=5.2em}}}} {{Layout/Map|SE2|c=SKLRT}} {{Layout/Map|SE3|c=SKLRT|r={{Layout/Map-UR|c=SKLRT|right=-2em|height=10.1em|width=2em}}}}</span><span style="display:block;text-align:right;">{{Layout/Map|SE5|c=SKLRT}} {{Layout/Map|SE4|c=SKLRT|r=}}</span></span> | ||
</div> | </div> | ||
|} | |} | ||
| Line 84: | Line 84: | ||
{| class="mw-collapsible mw-collapsed" style="width:100%;" | {| class="mw-collapsible mw-collapsed" style="width:100%;" | ||
!{{Layout/Platform|B|NEL}} | !{{Layout/Platform|B|NEL}} | ||
|style='padding-right:.5em;'|{{Layout/Arrow|NEL|180}} {{Layout/Station| | |style='padding-right:.5em;'|{{Layout/Arrow|NEL|180}} {{Layout/Station|NE18}} | ||
|style='padding-left:.5em;border-left:1px solid;width:200px'|'''Service Map''' | |style='padding-left:.5em;border-left:1px solid;width:200px'|'''Service Map''' | ||
|- | |- | ||
|colspan=3| | |colspan=3| | ||
<div style='overflow-x:scroll;white-space:nowrap;max-width:75vw;'> | <div style='overflow-x:scroll;white-space:nowrap;max-width:75vw;'> | ||
{{Layout/Map|NE17|c=NEL}} {{Layout/Map|NE16|#000|#fff|c=NEL|r=}} | {{Layout/Map|NE18|c=NEL}} {{Layout/Map|NE17|c=NEL}} {{Layout/Map|NE16|#000|#fff|c=NEL|r=}} | ||
</div> | </div> | ||
|} | |} | ||
| Line 100: | Line 100: | ||
|A||{{WAB}}||style="text-align:left;"|Compass One, Sengkang Public Library | |A||{{WAB}}||style="text-align:left;"|Compass One, Sengkang Public Library | ||
|- | |- | ||
|B||{{WAB}}||style="text-align:left;"|Sengkang | |B||{{WAB}}||style="text-align:left;"|Sengkang Bus Interchange | ||
|- | |- | ||
|C||{{WAB}}||style="text-align:left;"|Sengkang Square, Taxi Stand | |C||{{WAB}}||style="text-align:left;"|Sengkang Square, Taxi Stand | ||
| Line 116: | Line 116: | ||
!colspan=5 style="{{CSS/NEL|s=|t=}}text-align:center;"|{{Icon|MRT|W|20px|d=inline}} {{NEL|style={{CSS/NEL|bg=none|s=|t=}}}} | !colspan=5 style="{{CSS/NEL|s=|t=}}text-align:center;"|{{Icon|MRT|W|20px|d=inline}} {{NEL|style={{CSS/NEL|bg=none|s=|t=}}}} | ||
{{Timing|NE1||05:44|05:44|06:04|23:30|nv=}} | {{Timing|NE1||05:44|05:44|06:04|23:30|nv=}} | ||
{{Timing| | {{Timing|NE18||05:33|05:33|05:53|00:27|nv=}} | ||
|- | |- | ||
!colspan=5 style="{{CSS/SKLRT|s=|t=}}text-align:center;"|{{Icon|LRT|W|20px|d=inline}} {{SKLRT|style={{CSS/SKLRT|bg=none|s=|t=}}}} | !colspan=5 style="{{CSS/SKLRT|s=|t=}}text-align:center;"|{{Icon|LRT|W|20px|d=inline}} {{SKLRT|style={{CSS/SKLRT|bg=none|s=|t=}}}} | ||
| Line 129: | Line 129: | ||
{|class="wikitable" | {|class="wikitable" | ||
!width=240|Bus Stop!!width=30|Exit!!width=300|Bus Service | !width=240|Bus Stop!!width=30|Exit!!width=300|Bus Service | ||
{{BusGuide|{{BS67009}}| {{Exit/Cell|B}} }}{{Bus/80}} {{Bus/83}} {{Bus/86}} {{Bus/87 | {{BusGuide|{{BS67009}}| {{Exit/Cell|B}} }}{{Bus/80}} {{Bus/83}} {{Bus/86}} {{Bus/87}} {{Bus/159}} {{Bus/163}} {{Bus/371}} {{Bus/372}} {{Bus/374}} {{Bus/965}} | ||
{{BusGuide|{{BS67441}}| {{Exit/Cell|A}} }}{{Bus/43}} {{Bus/43|a=M}} {{Bus/83}} {{Bus/85}} {{Bus/109}} {{Bus/159}} {{Bus/161}} {{Bus/372}} {{Bus/374}} | |||
{{BusGuide|{{BS67441}}| {{Exit/Cell|A}} }}{{Bus/43}} {{Bus/43|a=M}} {{Bus/83}} {{Bus/85}} {{Bus/109 | {{BusGuide|{{BS67449}}| {{Exit/Cell|A}} }}{{Bus/43}} {{Bus/43|a=M}} {{Bus/83}} {{Bus/85}} {{Bus/109}} {{Bus/159}} {{Bus/161}} | ||
{{BusGuide|{{BS67449}}| {{Exit/Cell|A}} }}{{Bus/43}} {{Bus/43|a=M}} {{Bus/83}} {{Bus/85}} {{Bus/109 | {{BusGuide|{{BS67181}}| {{Exit/Cell|B}} }}{{Bus/27}} {{Bus/89}} {{Bus/89|a=e}} {{Bus/102}} {{Bus/159}} {{Bus/372}} {{Bus/965}} | ||
{{BusGuide|{{BS67181}}| {{Exit/Cell|B}} }}{{Bus/27}} {{Bus/89}} {{Bus/89|a=e}} {{Bus/102 | |||
{{BusGuide|{{BS67189}}| {{Exit/Cell|B}} }}{{Bus/27}} {{Bus/89}} {{Bus/89|a=e}} {{Bus/102}} {{Bus/163}} {{Bus/371}} {{Bus/965}} | {{BusGuide|{{BS67189}}| {{Exit/Cell|B}} }}{{Bus/27}} {{Bus/89}} {{Bus/89|a=e}} {{Bus/102}} {{Bus/163}} {{Bus/371}} {{Bus/965}} | ||
{{BusGuide|{{BS67401}}| {{Exit/Cell|D}} }}{{Bus/50}} {{Bus/102}} {{Bus/119 | {{BusGuide|{{BS67401}}| {{Exit/Cell|D}} }}{{Bus/50}} {{Bus/102}} {{Bus/119}} {{Bus/159}} {{Bus/161}} | ||
{{BusGuide|{{BS67409}}| {{Exit/Cell|D}} }}{{Bus/50}} {{Bus/102}} {{Bus/119 | {{BusGuide|{{BS67409}}| {{Exit/Cell|D}} }}{{Bus/50}} {{Bus/102}} {{Bus/119}} {{Bus/159}} {{Bus/161}} {{Bus/372}} {{Bus/374}} | ||
|} | |} | ||
Latest revision as of 15:59, 10 December 2024
!
|
TRAVEL ADVISORY | !
| ||||
|---|---|---|---|---|---|---|
| ||||||
Sengkang 盛港 செங்காங் NE16STC | |
  | |
| Station Information | |
|---|---|
| Address | 5 Sengkang Square Singapore 545062 |
| Line(s) | North East Line Sengkang LRT |
| Structure | Underground (NEL) Elevated (SKLRT) |
| Connections | |
| Abbreviation | SKG |
Sengkang (NE16/STC) is a Mass Rapid Transit (MRT) station on the North East Line and a Light Rail Transit (LRT) station on the Sengkang LRT.
History[edit]
| Date | Event |
|---|---|
| 18 January 2003 | Station officially opened |
| 20 June 2003 | Station interchanged with North East Line |
Artworks[edit]
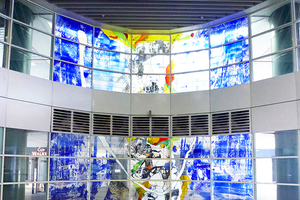
North East Line: T.R.A.N.S.I.T.I.O.N.S. by Koh Bee Liang
Stained glass windows filter light into the station, filling it with coloured rays. The glass murals mark Sengkang’s changes from kampongs to high-raised buildings that are now part of the landscape. Like time passing, the work also changes throughout the day with the transition of the sun across the sky.[1]

Layout[edit]
| L3 |
| |||||||
|---|---|---|---|---|---|---|---|---|
| Platform 1/2 | ||||||||
| ||||||||
| L2 | SKLRT Concourse | Faregates, Ticketing Machines | ||||||
| L1 | Street Level | Sengkang Bus Interchange, Compassvale Bus Interchange, Compass One | ||||||
| NEL Concourse | Faregates, Ticketing Machines, Passenger Service Centre, Transitlink Ticket Office | |||||||
| B1 |
| |||||||
| Platform A/B | ||||||||
| ||||||||
Exits[edit]
| Exit | Disabled-Access | Location/Nearby |
|---|---|---|
| A | Compass One, Sengkang Public Library | |
| B | Sengkang Bus Interchange | |
| C | Sengkang Square, Taxi Stand | |
| D | Sengkang East Way, Taxi Stand |
Transport Services[edit]
First/Last Train Timing[edit]
| Destination | First Train | Last Train | ||
|---|---|---|---|---|
| Mon − Fri | Sat | Sun & P.H. | Daily | |
| NE1HarbourFront | 05:44 | 05:44 | 06:04 | 23:30 |
| NE18Punggol Coast | 05:33 | 05:33 | 05:53 | 00:27 |
| STCSengkang via SE1Compassvale |
05:25 | 05:25 | 05:45 | 00:21 |
| STCSengkang via SE5Ranggung |
05:29 | 05:29 | 05:49 | 00:35 |
| STCSengkang via SW1Cheng Lim |
05:31 | 05:31 | 05:51 | 00:13 |
| STCSengkang via SW8Renjong |
05:33 | 05:33 | 05:53 | 00:37 |
Bus[edit]
- More travel information: Alternative Travel Method
| Bus Stop | Exit | Bus Service | |
|---|---|---|---|
Sengkang Int Sengkang Sq | NE16STCSengkang Compass One |
B |
80 83 86 87 159 163 371 372 374 965 |
Sengkang Community Hub Sengkang East Rd | NE16STCSengkang Compass One |
A |
43 43M 83 85 109 159 161 372 374 |
Blk 323B Sengkang East Rd | A |
43 43M 83 85 109 159 161 | |
Blk 240 Compassvale Rd | NE16STCSengkang | B |
27 89 89e 102 159 372 965 |
Opp Blk 241 Compassvale Rd | NE16STCSengkang | B |
27 89 89e 102 163 371 965 |
Opp Sengkang Stn/Blk 260A Sengkang East Way | NE16STCSengkang | D |
50 102 119 159 161 |
Sengkang Stn Sengkang East Way | NE16STCSengkang Compass One |
D |
50 102 119 159 161 372 374 |
References[edit]
- ↑ "Art in Transit". Land Transport Authority.
| [ V • T • E ] | ||
|---|---|---|
| Stations | HarbourFront • Outram Park • Chinatown • Clarke Quay • Dhoby Ghaut • Little India • Farrer Park • Boon Keng • Potong Pasir • Woodleigh • Serangoon • Kovan • Hougang • Buangkok • Sengkang • Punggol • Punggol Coast | |
| Rolling Stock | 751A • 751C • 851E | |
| Depots | Sengkang | |
| Others | Bridging Service | |
| [ V • T • E ] | ||
|---|---|---|
| Stations | Sengkang | |
| East LoopCompassvale • Rumbia • Bakau • Kangkar • Ranggung | ||
| West LoopCheng Lim • Farmway • Kupang • Thanggam • Fernvale • Layar • Tongkang • Renjong | ||
| Rolling Stock | 810 • 810A • 810D | |
| Depots | Sengkang | |
| Others | Bridging Service | |