Difference between revisions of "Bedok station"
Jump to navigation
Jump to search

m (→Bus) |
Wekelwrady (talk | contribs) |
||
| (7 intermediate revisions by 5 users not shown) | |||
| Line 1: | Line 1: | ||
{{Infobox | {{Travel Advisory|REW=showonly}} | ||
| | {{Infobox | ||
|header=<td colspan=2><div style='display:flex;justify-content:space-between'><div><big>'''Bedok'''</big><br>勿洛<br>பிடோக்</div><div style='display:flex;align-items:flex-end;flex-direction:column'><div style='display:flex;align-items:center'>{{Code/S|EW5|EWL}}</div><div>'''Abbr:''' BDK</div></div></div>[[File:Bedok-EWL.png|centre|300px]]</td> | |||
|info= | |||
{{Infoline|Address|315 New Upper Changi Road<br><small>Singapore 467347</small>|style=line-height:1.3}} | |||
| | |||
{{Infoline|Address|315 New Upper Changi Road<br>Singapore 467347}} | |||
{{Infoline|Line(s)|{{EWL}}}} | {{Infoline|Line(s)|{{EWL}}}} | ||
{{Infoline|Structure|Elevated}} | {{Infoline|Structure|Elevated}} | ||
{{Infoline|Connections|{{Icon|Bus|B|25px| | {{Infoline|Connections|{{Icon|Bus|B|25px|style={{CSS/BUS|xfc=|xbc=}}|a=Bus}} {{Icon|Taxi|W|25px|style={{CSS/LTA|xfc=|xbc=}}|a=Taxi}}}} | ||
}} | }} | ||
'''Bedok (EW5)''' is a [[Mass Rapid Transit]] (MRT) station on the {{EWL}}. | '''Bedok (EW5)''' is a [[Mass Rapid Transit]] (MRT) station on the {{EWL}}. | ||
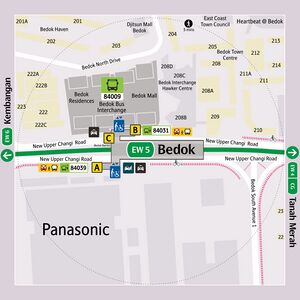
== | ==Entrances/Exits== | ||
{|class= | <div style='display:flex;flex-wrap:wrap;align-items:flex-start;width:100%'> | ||
! | <div style='margin-right:.5em;margin-bottom:.5em'>[[File:Bedok LocalDirectory.jpg|300px]]</div> | ||
{|class=wikitable style='margin:0;max-width:40em' | |||
!Exit!!Nearby Point of Interest | |||
|- | |||
!{{Exit|{{Exit/Cell|A}}}} | |||
|New Upper Changi Road, Taxi Stand | |||
|- | |||
!{{Exit|{{Exit/Cell|B}}}} | |||
|Bedok Bus Interchange, Bedok Mall, Taxi Stand | |||
|- | |- | ||
| | !{{Exit|{{Exit/Cell|C}}}} | ||
|Bedok Mall (Basement 2) | |||
|} | |} | ||
</div> | |||
== | ==First/Last Train Timing== | ||
{| class= | {| class=wikitable style='text-align:center' | ||
!rowspan= | !rowspan=2 width=230|<div style='display:flex;align-content:center'><div style='border-radius:100%;width:1.5em;height:1.5em;line-height:1.5em;font-size:2em;text-align:center;font-weight:bold;{{CSS/LTA|xfc=|xbc=}}'>➔</div><div style='display:flex;flex-direction:column;justify-content:center;margin-left:.5em'><div>Train to</div></div></div> | ||
!colspan=2 style='background-color:#f8f9fa'|First Train!!style='background-color:#f8f9fa'|Last Train | |||
|- | |||
|width=70|Weekday/Sat||width=70|Sun/P.H.||width=70|Daily | |||
|style=' | |- | ||
|style=' | |colspan=5 style="{{CSS/EWL|xfc=|xbc=}}"|<div style='display:flex;align-content:center'><big style='font-size:1.5em'>{{Code/S|EWL|EWL}}</big><div style='padding:.3em;margin-left:1em;background-color:#fff;border-radius:.25em'>{{SMRT|80x25px}}</div></div> | ||
|- | |||
|style='text-align:left;font-weight:bold'|{{Stn/Pasir Ris|xline=}} | |||
|06:19||06:47||00:30 | |||
|- | |- | ||
| | |style='text-align:left;font-weight:bold'|{{Stn/Tuas Link}} | ||
|05:40||06:06||23:36 | |||
{{ | |||
|} | |} | ||
==Layout== | |||
{| style='width:100%' | |||
|- style='border-top:1px solid' | |||
!rowspan=3 style='width:2.5em;vertical-align:top'|L2 | |||
{{StnLayout/Platform|A|EWL|0|<div>{{Stn/Pasir Ris}}</div><div>{{Stn/Changi Airport}} <small>via {{Stn/Tanah Merah}}</small></div>| | |||
{{StnLayout/Stn|align=right|angle=45|width=7em|lines=<div style='position:absolute;top:9.5em;left:6em;width:16em;border-bottom:0.6em solid;{{CSS/EWL|xbg=|xfc=}}'></div>|bg=#000|codes={{Code/S|EW5|EWL}}|name={{Stn|Bedok|c=#fff}}}} | |||
{{StnLayout/Stn|align=right|angle=45|codes={{Code/S|EW4|EWL|bs=solid solid none}}{{Code/S|CG|EWL|bs=none solid solid}}<small style='margin-top:4em'>(3 mins)</small>|name={{Stn|Tanah Merah|c=#000}}}} | |||
{{StnLayout/Stn|align=right|angle=45|codes={{Code/S|EW3|EWL}}<small>(7 mins)</small>|name={{Stn|Simei|c=#000}}}} | |||
{{StnLayout/Stn|align=right|angle=45|codes={{Code/S|EW2|EWL}}{{Code/J|EWL|DTL|w=0.5em|h=1em|m=-0.15em 0|bs=none solid|dir=bottom}}{{Code/S|DT32|DTL}}<small>(9 mins)</small>|name={{Stn|Tampines|c=#000}}}} | |||
{{StnLayout/Stn|align=right|angle=45|codes={{Code/S|EW1|EWL}}<small>(12 mins)</small>|name={{Stn|Pasir Ris|c=#000}}}} | |||
{{StnLayout/Stn|align=right|angle=45|top=14em|bottom=3.5em|width=7em|lines=<div style='position:absolute;top:9.5em;left:-14.0em;width:22em;height:5em;border-bottom:0.6em double;border-left:0.6em double;border-bottom-left-radius:1em;{{CSS/EWL|xbg=|xfc=}}'></div>|codes={{Code/S|CG1|EWL|bs=solid solid none}}{{Code/S|DT35|DTL|bs=none solid solid}}<small>(9 mins)</small>|name={{Stn|Expo|c=#000}}}} | |||
{{StnLayout/Stn|align=right|angle=45|top=14em|bottom=3.5em|codes={{Code/S|CG2|EWL}}<small>(14 mins)</small>|name={{Stn|Changi Airport|c=#000}}}} | |||
|width=33rem}} | |||
|- | |- | ||
|colspan=2 | |colspan=2 style="border-width:2px;border-color:black;border-style:dashed solid;padding:.25em 1em"| | ||
{| style='text-align:center;width:100%' | |||
|style='width:10%;border:1px solid gray'| | |||
|style='width:10%;border:1px solid gray'|{{Icon|EscD|W|36px|style={{CSS/LTA|xfc=|xbc=}}}} | |||
|style='width:10%;border:1px solid gray'|{{Icon|Lift|W|36px|style={{CSS/LTA|xfc=|xbc=}}}} | |||
|style='width:10%;border:1px solid gray'|{{Icon|Lift|W|36px|style={{CSS/LTA|xfc=|xbc=}}}} | |||
|style='width:10%;border:1px solid gray'|{{Icon|EscD|W|36px|style={{CSS/LTA|xfc=|xbc=}}}} {{Icon|StairD|W|36px|style={{CSS/LTA|xfc=|xbc=}}}} | |||
|style='width:10%;border:1px solid gray'| | |||
|- | |- | ||
!colspan=6|Platform A/B | |||
|- | |- | ||
| | |style='width:10%;border:1px solid gray'| | ||
|style='width:10%;border:1px solid gray'|{{Icon|EscD|W|36px|style={{CSS/LTA|xfc=|xbc=}}}} | |||
{{ | |style='width:10%;border:1px solid gray'|{{Icon|Lift|W|36px|style={{CSS/LTA|xfc=|xbc=}}}} | ||
|style='width:10%;border:1px solid gray'|{{Icon|Lift|W|36px|style={{CSS/LTA|xfc=|xbc=}}}} | |||
|style='width:10%;border:1px solid gray'|{{Icon|EscD|W|36px|style={{CSS/LTA|xfc=|xbc=}}}} {{Icon|StairD|W|36px|style={{CSS/LTA|xfc=|xbc=}}}} | |||
|style='width:10%;border:1px solid gray'| | |||
|} | |} | ||
|- | |- | ||
{{StnLayout/Platform|B|EWL|180|<div>{{Stn/Tuas Link}}</div>| | |||
{{StnLayout/Stn|align=left|angle=-45|lines=<div style='position:absolute;top:9.5em;left:3em;width:111em;border-bottom:0.6em solid;{{CSS/EWL|xbg=|xfc=}}'></div>|codes={{Code/S|EW33|EWL}}<small>(75 mins)</small>|name={{Stn|Tuas Link|c=#000}}}} | |||
|Faregates, Ticketing Machines, Passenger Service Centre, | {{StnLayout/Stn|align=left|angle=-45|codes={{Code/S|EW32|EWL}}<small>(72 mins)</small>|name={{Stn|Tuas West Road|c=#000}}}} | ||
|- | {{StnLayout/Stn|align=left|angle=-45|codes={{Code/S|EW31|EWL}}<small>(69 mins)</small>|name={{Stn|Tuas Crescent|c=#000}}}} | ||
{{StnLayout/Stn|align=left|angle=-45|codes={{Code/S|EW30|EWL}}<small>(66 mins)</small>|name={{Stn|Gul Circle|c=#000}}}} | |||
{{StnLayout/Stn|align=left|angle=-45|codes={{Code/S|EW29|EWL}}<small>(63 mins)</small>|name={{Stn|Joo Koon|c=#000}}}} | |||
{{StnLayout/Stn|align=left|angle=-45|codes={{Code/S|EW28|EWL}}<small>(59 mins)</small>|name={{Stn|Pioneer|c=#000}}}} | |||
{{StnLayout/Stn|align=left|angle=-45|codes={{Code/S|EW27|EWL}}<small>(57 mins)</small>|name={{Stn|Boon Lay|c=#000}}}} | |||
{{StnLayout/Stn|align=left|angle=-45|codes={{Code/S|EW26|EWL}}<small>(54 mins)</small>|name={{Stn|Lakeside|c=#000}}}} | |||
{{StnLayout/Stn|align=left|angle=-45|codes={{Code/S|EW25|EWL}}<small>(52 mins)</small>|name={{Stn|Chinese Garden|c=#000}}}} | |||
{{StnLayout/Stn|align=left|angle=-45|codes={{Code/S|EW24|EWL|bs=solid solid none}}{{Code/S|NS1|NSL|bs=none solid solid}}<small>(49 mins)</small>|name={{Stn|Jurong East|c=#000}}}} | |||
{{StnLayout/Stn|align=left|angle=-45|codes={{Code/S|EW23|EWL}}<small>(45 mins)</small>|name={{Stn|Clementi|c=#000}}}} | |||
{{StnLayout/Stn|align=left|angle=-45|codes={{Code/S|EW22|EWL}}<small>(42 mins)</small>|name={{Stn|Dover|c=#000}}}} | |||
{{StnLayout/Stn|align=left|angle=-45|codes={{Code/S|EW21|EWL|bs=solid solid none}}{{Code/S|CC22|CCL|bs=none solid solid}}<small>(40 mins)</small>|name={{Stn|Buona Vista|c=#000}}}} | |||
{{StnLayout/Stn|align=left|angle=-45|codes={{Code/S|EW20|EWL}}<small>(37 mins)</small>|name={{Stn|Commonwealth|c=#000}}}} | |||
{{StnLayout/Stn|align=left|angle=-45|codes={{Code/S|EW19|EWL}}<small>(35 mins)</small>|name={{Stn|Queenstown|c=#000}}}} | |||
{{StnLayout/Stn|align=left|angle=-45|codes={{Code/S|EW18|EWL}}<small>(33 mins)</small>|name={{Stn|Redhill|c=#000}}}} | |||
{{StnLayout/Stn|align=left|angle=-45|codes={{Code/S|EW17|EWL}}<small>(31 mins)</small>|name={{Stn|Tiong Bahru|c=#000}}}} | |||
{{StnLayout/Stn|align=left|angle=-45|codes={{Code/S|EW16|EWL|bs=solid solid none}}{{Code/S|NE3|NEL|bs=none solid}}{{Code/S|TE17|TEL|bs=none solid solid}}<small>(28 mins)</small>|name={{Stn|Outram Park|c=#000}}}} | |||
{{StnLayout/Stn|align=left|angle=-45|codes={{Code/S|EW15|EWL}}<small>(25 mins)</small>|name={{Stn|Tanjong Pagar|c=#000}}}} | |||
{{StnLayout/Stn|align=left|angle=-45|codes={{Code/S|EW14|EWL|bs=solid solid none}}{{Code/S|NS26|NSL|bs=none solid solid}}<small>(22 mins)</small>|name={{Stn|Raffles Place|c=#000}}}} | |||
{{StnLayout/Stn|align=left|angle=-45|codes={{Code/S|EW13|EWL|bs=solid solid none}}{{Code/S|NS25|NSL|bs=none solid solid}}<small>(20 mins)</small>|name={{Stn|City Hall|c=#000}}}} | |||
{{StnLayout/Stn|align=left|angle=-45|codes={{Code/S|EW12|EWL|bs=solid solid none}}{{Code/S|DT14|DTL|bs=none solid solid}}<small>(18 mins)</small>|name={{Stn|Bugis|c=#000}}}} | |||
{{StnLayout/Stn|align=left|angle=-45|codes={{Code/S|EW11|EWL}}<small>(15 mins)</small>|name={{Stn|Lavender|c=#000}}}} | |||
{{StnLayout/Stn|align=left|angle=-45|codes={{Code/S|EW10|EWL}}<small>(13 mins)</small>|name={{Stn|Kallang|c=#000}}}} | |||
{{StnLayout/Stn|align=left|angle=-45|codes={{Code/S|EW9|EWL}}<small>(10 mins)</small>|name={{Stn|Aljunied|c=#000}}}} | |||
{{StnLayout/Stn|align=left|angle=-45|codes={{Code/S|EW8|EWL|bs=solid solid none}}{{Code/S|CC9|CCL|bs=none solid solid}}<small>(8 mins)</small>|name={{Stn|Paya Lebar|c=#000}}}} | |||
{{StnLayout/Stn|align=left|angle=-45|codes={{Code/S|EW7|EWL}}<small>(6 mins)</small>|name={{Stn|Eunos|c=#000}}}} | |||
{{StnLayout/Stn|align=left|angle=-45|codes={{Code/S|EW6|EWL}}<small>(3 mins)</small>|name={{Stn|Kembangan|c=#000}}}} | |||
{{StnLayout/Stn|align=left|angle=-45|bg=#000|codes={{Code/S|EW5|EWL}}|name={{Stn|Bedok|c=#fff}}}} | |||
|width=96rem}} | |||
|-style='border-top:1px solid' | |||
!style='width:2.5em;vertical-align:top' rowspan=2|L1 | |||
|Concourse | |||
|Faregates, Ticketing Machines, <span style='display:inline-block;text-align:center;'>{{Icon|PSC|W|36px|style={{CSS/EWL|xfc=|xbc=}}}}<br>Passenger Service Centre</span>, SimplyGo Ticket Office | |||
|-style='border-top:1px solid' | |||
|Street Level | |Street Level | ||
|Bedok Bus Interchange, Bedok Mall | |Bedok Bus Interchange, Bedok Mall | ||
|- | |-style='border-top:1px solid' | ||
!B1 | !style='width:2.5em;vertical-align:top'|B1 | ||
|Underpass | |Underpass | ||
|Bedok Mall (Basement 2) | |Bedok Mall (Basement 2) | ||
|} | |} | ||
== | ===Schematic Track Diagram=== | ||
{| | '''{{EWL|ta=:}}''' | ||
{| | |||
|- | |-style='height:1em' | ||
| | |rowspan=2 style='background-color:#ddd;border-width:2px;{{CSS/EWL|xfc=|xbg=}};border-style:solid none'|{{Stn/Kembangan}} | ||
|- | |rowspan=2 width=10 style='border-width:2px;{{CSS/EWL|xfc=|xbg=}};border-style:solid none'| | ||
|rowspan=2 style='background-color:#ddd;border-width:2px;{{CSS/EWL|xfc=|xbg=}};border-style:solid none'|{{Stn/Bedok}} | |||
|- | |width=20 rowspan=2 style='border-width:2px;{{CSS/EWL|xfc=|xbg=}};border-style:solid none'| | ||
| | |style='background-color:#ddd;border-width:2px;{{CSS/EWL|xfc=|xbg=}};border-style:solid none'|{{Stn/Tanah Merah|xline=}} | ||
|width=10| | |||
|- style='height:1em' | |||
|style='background-color:#ddd;border-width:2px;{{CSS/EWL|xfc=|xbg=}};border-style:solid none'|{{Stn/Tanah Merah|xline=}} | |||
|width=10| | |||
|} | |} | ||
== | ==Bus Connections== | ||
=== | <div style='display:flex;flex-wrap:wrap;align-items:flex-start'> | ||
<div style='margin-bottom:0.5em;margin-right:0.5em;padding:0 .25em;background-color:#ffd100'> | |||
<div style='display:flex;justify-content:center;align-items:center;margin:0 auto;width:4em;height:1.5em;font-size:2em'><div style='position:relative;overflow:hidden;font-size:0'>[[File:IconB-MRT.png|x30px|link=|alt=]]<div style='position:absolute;top:50%;left:50%;transform:translate(-50%,-50%) rotate(45deg);width:150%;height:4px;background-color:#f00'></div><div style='position:absolute;top:50%;left:50%;transform:translate(-50%,-50%) rotate(-45deg);width:150%;height:4px;background-color:#f00'></div></div><div style='line-height:1'>➔</div><div style='font-size:0'>[[File:IconB-Bus.png|x30px|link=|alt=]]</div></div>[[Alternative Travel Method/Bedok|<div style='text-decoration-thickness:1px;text-decoration-line:underline;text-decoration-style:dotted;color:#000;text-align:center'>Rail Disruption Guide</div>]] | |||
| | |||
'''Bridging Service:''' | |||
| | *{{Stn/Pasir Ris|xline=}}<br>{{BS84031|landmark=}} | ||
*{{Stn/Tuas Link}}<br>{{BS84039|landmark=}} | |||
{{ | </div> | ||
{{ | {|class=wikitable style='margin:0;max-width:50em' | ||
!Bus Stop!!width=30|Exit!!width=300|Bus Service | |||
{{Stn/BusConnection|84009|{{Exit/Cell|B}}|bus={{Bus/7}} {{Bus/9}} {{Bus/14}} {{Bus/16}} {{Bus/16|a=M}} {{Bus/17}} {{Bus/26}} {{Bus/30}} {{Bus/30|a=e}} {{Bus/32}} {{Bus/33}} {{Bus/35}} {{Bus/35|a=M}} {{Bus/38}} {{Bus/40}} {{Bus/60}} {{Bus/69}} {{Bus/87}} {{Bus/155}} {{Bus/168}} {{Bus/196}} {{Bus/197}} {{Bus/222}} {{Bus/225|a=G|l=225G}} {{Bus/225|a=W|l=225W}} {{Bus/228}} {{Bus/229}} {{Bus/401}} {{Bus/854}}}} | |||
{{Stn/BusConnection|84039|{{Exit/Cell|A}}|bus={{Bus/2}} {{Bus/9}} {{Bus/24}} {{Bus/25}} {{Bus/28}} {{Bus/31}} {{Bus/35}} {{Bus/35|a=M}} {{Bus/67}} {{Bus/137}} {{Bus/222}}}} | |||
{{Stn/BusConnection|84031|{{Exit/Cell|B}}|bus={{Bus/2}} {{Bus/9}} {{Bus/24}} {{Bus/25}} {{Bus/28}} {{Bus/31}} {{Bus/35}} {{Bus/35|a=M}} {{Bus/67}} {{Bus/137}} {{Bus/222}}}} | |||
|} | |} | ||
</div> | |||
=== | ==History== | ||
{|class="wikitable mw-collapsible" style="width:50%" | |||
{|class="wikitable" | !width=150|Date!!Event | ||
!width= | |- | ||
|4 November 1989||Station officially opened | |||
|} | |} | ||
Latest revision as of 03:13, 23 April 2025
!
|
TRAVEL ADVISORY (22/4/2025) | !
| ||||
|---|---|---|---|---|---|---|
| ||||||
Bedok 勿洛 பிடோக் EW5 Abbr: BDK  |
|
| Address | 315 New Upper Changi Road Singapore 467347 |
|---|---|
| Line(s) | East–West Line |
| Structure | Elevated |
| Connections | |
Bedok (EW5) is a Mass Rapid Transit (MRT) station on the East–West Line.
Entrances/Exits[edit]

| Exit | Nearby Point of Interest |
|---|---|
A |
New Upper Changi Road, Taxi Stand |
B |
Bedok Bus Interchange, Bedok Mall, Taxi Stand |
C |
Bedok Mall (Basement 2) |
First/Last Train Timing[edit]
➔ Train to |
First Train | Last Train | ||
|---|---|---|---|---|
| Weekday/Sat | Sun/P.H. | Daily | ||
EWL | ||||
EW1 |
06:19 | 06:47 | 00:30 | |
EW33 |
05:40 | 06:06 | 23:36 | |
Layout[edit]
| L2 |
|
||||||||||||||||||
|---|---|---|---|---|---|---|---|---|---|---|---|---|---|---|---|---|---|---|---|
| |||||||||||||||||||
|
|||||||||||||||||||
| L1 | Concourse | Faregates, Ticketing Machines, Passenger Service Centre, SimplyGo Ticket Office | |||||||||||||||||
| Street Level | Bedok Bus Interchange, Bedok Mall | ||||||||||||||||||
| B1 | Underpass | Bedok Mall (Basement 2) | |||||||||||||||||
Schematic Track Diagram[edit]
EW6 |
EW5 |
EW4 CG |
|||
EW4 CG |
Bus Connections[edit]
➔
Rail Disruption Guide
Bridging Service:
- EW1
 84031Bedok Stn Exit B
New Upp Changi Rd - EW3384039Bedok Stn Exit A
New Upp Changi Rd
| Bus Stop | Exit | Bus Service |
|---|---|---|
84009 Bedok Int Bedok Nth Dr |
B |
|
84039 Bedok Stn Exit A New Upp Changi Rd |
A |
|
84031 Bedok Stn Exit B New Upp Changi Rd |
B |
History[edit]
| Date | CollapseEvent |
|---|---|
| 4 November 1989 | Station officially opened |
References[edit]
| [ V • T • E ] | ||
|---|---|---|
| Stations | Pasir Ris • Tampines • Simei • Tanah Merah • Bedok • Kembangan • Eunos • Paya Lebar • Aljunied • Kallang • Lavender • Bugis • City Hall • Raffles Place • Tanjong Pagar • Outram Park • Tiong Bahru • Redhill • Queenstown • Commonwealth • Buona Vista • Dover • Clementi • Jurong East • Chinese Garden • Lakeside • Boon Lay • Pioneer • Joo Koon • Gul Circle • Tuas Crescent • Tuas West Road • Tuas Link
Changi Airport ExtensionTanah Merah • Expo • Changi Airport | |
| Rolling Stock | 151 • 151A • 151B • 151C • R151 | |
| Depots | Changi • Ulu Pandan • Tuas • East Coast | |
| Others | Bridging Service | |